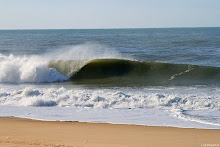
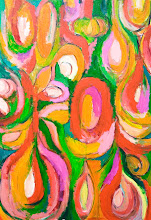
 many many many many thanks to shot (you know, the essential one), who photochopped my bodged print for me - into this: the correct layout. . . can you see the tide going out now? I can!
Showing posts with label etching 101. Show all posts
Showing posts with label etching 101. Show all posts
etching (revisited)
many many many many thanks to shot (you know, the essential one), who photochopped my bodged print for me - into this: the correct layout. . . can you see the tide going out now? I can!
etching (continued)
so, where were we? oh yes! I remember. . .
 the seven plates, each of a simple image consisting initially of a few etched lines only - together a progression - were ready to be inked up and printed. . .
because of all the really annoying irritating people
who take the class on a Thursday
and seem to spend their whole morning asking me what I am doing. . .
I am only there for the morning, so do not have this luxury
(altho I do ask the real artists the odd question)
and I especially don't like the short-temperedness it brings out in me
(*deep breath*)
.
 the seven plates, each of a simple image consisting initially of a few etched lines only - together a progression - were ready to be inked up and printed. . .
the inking up took almost three hours. . . I should have stuck to my original plan, to do a test print in black, just to see how the lines worked and then decide where I want to add texture (there are other techniques for adding visual texture to your image)
but I got carried away by the thought of colour! so I worked across the seven images trying to make sense of the lines (what was water? what was a tide pool? what was a shingle bank?)
this took far longer than it ought to have done. . .
but I got carried away by the thought of colour! so I worked across the seven images trying to make sense of the lines (what was water? what was a tide pool? what was a shingle bank?)
this took far longer than it ought to have done. . .
because of all the really annoying irritating people
who take the class on a Thursday
and seem to spend their whole morning asking me what I am doing. . .
I am only there for the morning, so do not have this luxury
(altho I do ask the real artists the odd question)
and I especially don't like the short-temperedness it brings out in me
(*deep breath*)
.
eventually, with ten minutes to go, I was ready to print
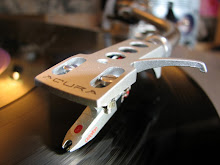
when printing from an etched plate onto paper, you have to first dampen your paper (this has something to do with the ink taking better to the paper if the paper is damp) and then you have to blot your paper (it can't be too damp, you see - you can tell by looking at the surface of the paper if it is too damp) (it's special etching printing paper, called Somerset Velvet) (I'm sure you can print onto other types of paper, but it's a learning curve and I'm at the bottom at the moment) .
when printing from an etched plate onto paper, you have to first dampen your paper (this has something to do with the ink taking better to the paper if the paper is damp) and then you have to blot your paper (it can't be too damp, you see - you can tell by looking at the surface of the paper if it is too damp) (it's special etching printing paper, called Somerset Velvet) (I'm sure you can print onto other types of paper, but it's a learning curve and I'm at the bottom at the moment) .
 I can't work out how to rotate the photo 90 degrees anti-clockwise, so you'll have to tip your head to the right to look at this. . .
however, the mistake I made
mine, I made it, the mistake
but partly because I was being rushed at the press
by one of the really annoying irritating people
who kept asking me questions
and staring over my shoulder at what I was doing
in a very invasive manner
so I lost my concentration
(I don't know where it went - but I lost it)
(only my concentration, thank goodness)
*DEEP BREATH*
was not to remember that the print comes out left-to-right-reversed. . .
. . .I forgot
hence the set of images doesn't work for me - they are supposed to show the tide going out, receding to reveal shingle banks from which mere tide pools emerge as the tide has gone fully out - from left to right - as you look at the print; you know, the way the Western brain looks at everything left to right? that's how we scan a set of images too. . . so, in the following, the seventh section on the far right is supposed to be the first on the far left, with the others from right to left following from left to right. . .
 *DEEP DEEP SIGH*
(also, there's not quite enough ink on on the two plates with the tide at its highest) (in the above image, the two on the right) (and, in retrospect, even at this stage, I wish I'd kept the water clean of ink and coloured the shingle. . .)
but, then again, I only wanted a test print to see if the lines of the water/shingle/shore work, so if I can look at it from that point of view, it's OK; and because of the nature of an etched print, I can actually add in the missing colours by painting with ink
however, I guess the beauty of etching is that I have the plates, and I can try again next time. . .
etching!
(less painful than pulling teeth)
so this was my second plate from last term:
so this was my second plate from last term:

the first plate was the same size but portrait, not landscape, with a very simple image of boats (I decided to keep the images really simple, as I was focussing on learning the technique); this term I have decided to work on a number of much smaller plates which I shall print all at once (rather than printing the same plate a number of times). . .
I can't remember how clearly I explained etching - so, a brief review. . .
you start with a zinc plate which is cleaned to remove grease; then you cover the surface of the plate with a "resist" (in this case wax) which protect the surface of the plate from the acid. . .
why do we need acid? well, the acid bites the lines/areas of our design/image/drawing into the plate and it is these indentations which will hold the ink when we come to print (so you only want it to "bite" where you choose to have a line, thus you need to protect the remainder of the surface of the metal plate)
but I'm getting ahead of myself
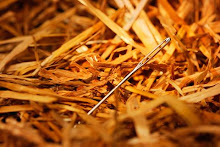
your plate has been cleaned and is now covered in a wax resist - you scratch the lines of your design/image into the wax - so exposing the metal of the plate. . . (there are different techinques for markings other than lines, but I'll talk about those another time) (I used an old bookbinding needle to draw the image, gently scratching thru the wax)
.
.
you can see the brown colour on the metal, in the image below, that's the wax resist (in this case "hard ground", which is the resists used for creating simple lines) (you pop the plate on a hot plate for a few minutes and then melt the hard ground wax onto the plate and then roll it evenly out)
.
.

.
my series of images in this case is the tideline on the river - at the top left of the plates you can see some stones on the shore, in the middle at the top are a few boats bobbing about as the tide comes in, and the lines moving from right to left across the plates show the tide coming in and filling up the pools created by undulations in the sand banks. . . in the the plate on the far left, the tide is out and the shore exposed and in the plate on the far right the water is at its highest
I have started (visually speaking) with only a few very simple lines, I will develop the image later; but at this point I only want to etch those lines onto the plate and then take a quick print to see how the lines work (visually speaking). . . so, the plates go into the acid for about twenty minutes:

you can tell if the line has been etched into the plate by gently scratching across the line - if it's deep enough, your fingernail catches (take it out of the acid first and rinse it off - don't put you hand in the acid to do this!)
when the acid has "bitten" into the plate sufficiently take the plate out of the acid and clean off the hard ground with white spirit (different waxes/resists are cleaned with different things) (things, oh how techincal of me!)
the following photo shows the plates: simple lines etched thru a hard ground resist, one session of twenty minutes in the acid, cleaned off and ready for the next stage

(not a great photo, as a really annoying woman was standing in the light, staring at me. . . *deep breath*); the following photo is a closer view of just one plate - boats at the top in the middle, slabs of stones in the top lefthand side corner (the stretch of the river near where I live has many stone slabs on it shore), edge of the shoreline on the right and a couple of tidalpools of water in the shingle in the middle. . .

very, very simple at this stage
..
..
this week I'll be taking a test print of the plates. . . and of course, when they are printed the image comes out the other way (what is left becomes right, and what is right becomes left) (so I reversed the image before I drew it out, as - in real life - from my vantage point, where I sketched the river, the shoreline was on the right. . . for some reason the balance of the image only works that way around for me and I remembered to reverse the image for printing so it comes out the "correct" way)
Subscribe to:
Posts (Atom)


